Making it last

The word heirloom has a magical sort of connotation to it. For many knitters, we want the piece to outlive ourselves. we want it to be loved, worn and passed down from generation to generation, but heirloom oftentimes becomes the pretty piece that is worn once, then put away for the next generation.

Hidden away.

Children have no idea that pulling on that thread can unravel priceless pieces of history. Those of us with desk jobs forget that leaning on our elbows thins the lovingly worked stitches to the point of disintegration.  Even the most mindful garment wearer will eventually walk their way through carefully turned heels.

What are knitters, and knitwear owners to do?

All October, coined Slow Fashion October by Karen Templer of Fringe Association, I have been researching darning techniques. I’ve been trying to answer the question of how to make my pieces last.

Durrow Cardigan - Damaged Elbows

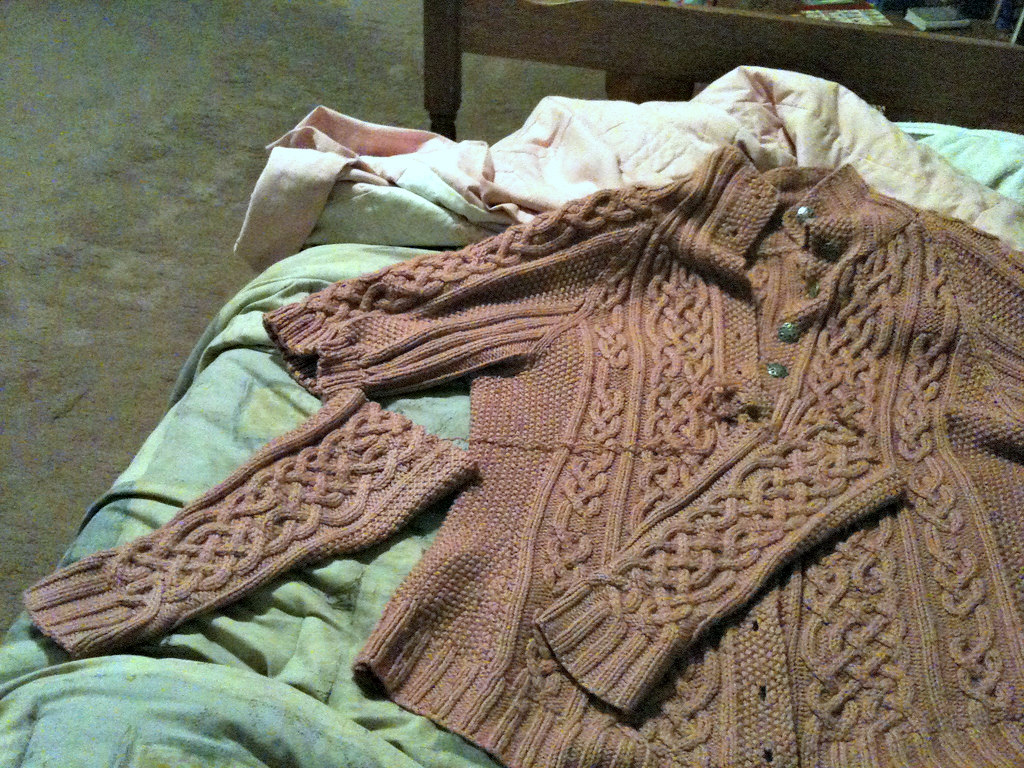
This is my Durrow Cardigan. It was my first foray into original sweater design, and the most expensive investment I’d made to that date. When the elbows wore through, I didn’t know any darning techniques, but I was determined to save this sweater. Next time, I’ll be prepared.

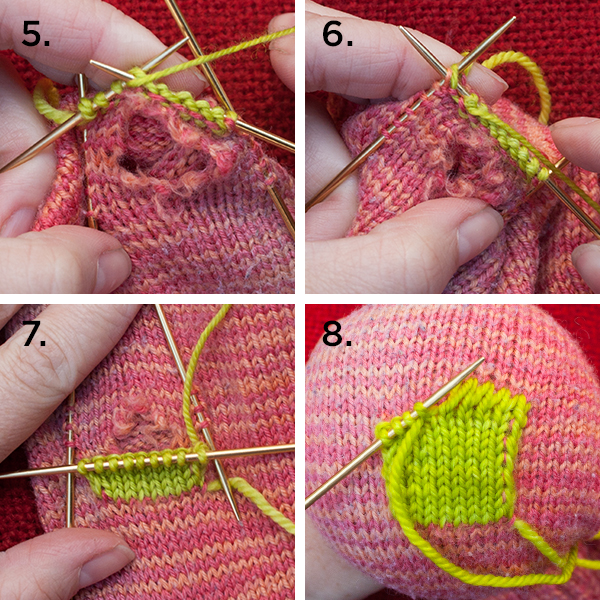
One of my favorite knitwear darning resources is Twist Collective’s post called Darn it All! There are several different options for fixing those holes including this adorable grafted patch.

TwistCollective.com - Darn It All

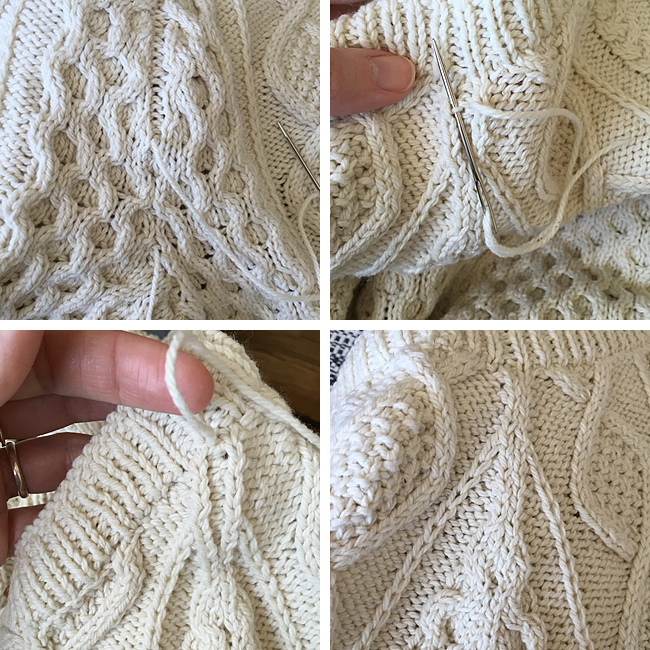
Sometimes a piece needs more care; more natural replacement of the missing section. I’ve found this article on something called reknitting or swiss darning. It looks complicated, but for those pieces you truly love, it’ll be worth it.

Fig-67

K. Line wrote the following about it:

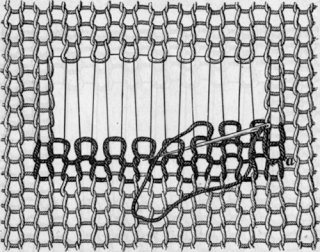
I won’t even try to explain it, though Sockupied does, very well, but after creating the stabilizing thread frame around the hole (mentioned above but not shown in the illustration), you actually use a double strand of regular thread to create a kind of loom over the hole. Then you weave into and out of one strand of the “loom” thread, stitch-by-stitch re-knitting with a darning needle. If worked in the same yarn, it is utterly indistinguishable from the original garment and it has the same properties of stretch.

Not all items can be saved the same way. Some can be grafted, others require you sacrifice some of the work to save the wearability. In the case of my Durrow Cardigan, I cut the sleeves, and used the good yarn to knit down from the live stitches to replace the ribbing. It’s still a staple in my closet for spring and fall.

We work very hard to create wearable art. Let’s take the time to care for it. It could turn a workhorse into an heirloom.

Acceptance

I’ve been furiously knitting the sleeves of Dutchess by Cheryl Burke while postponing the beginning of the body. With sweater knitting comes massive amount of research regarding fit, modifications and finishing.

You see, I’m sporting a pear shape. My pear shape means my bust is one size larger, and my hips are two sizes larger than my waist. Pants don’t fit, button down shirts don’t fit, sweaters don’t fit. The magic of knitting is that you can knit something with exactly your measurements. That, of course requires some work. Having accurate measurements of your body is step number one. Though I’ve written down mine (and verify them before starting any garment project), I prefer to keep them on the Customfit website. It’s accessible anywhere and everywhere.

Step two is swatching, and swatch, I did! Three, just in case. Even one stitch off has the potential to make several inches difference when it comes to sweater making.

Three Swatches

Then come the modifications. Though I’ve done plenty of research, math and study, one line from Knit.fm episode 10 – Modifying a Pattern really stuck with me: You’re fine just the way you are. It’s the knitting that needs to change it’s shape, not you.

I’d been trying to convince myself that ribbing is stretchy enough to make up the hip-to-waist size difference. The Truth is, it is. The Truth also states that ribbing is only 2.5 inches tall. The rest is miles of less stretchy stockinette. I realized the truth was telling me that this sweater was doomed to share space with the rest of the sweaters at the bottom of a bin in the back of my closet.

I accepted The Truth. I printed out some graph paper, and set to work figuring out the pattern instructions I was going to need to start at my hip size, and decrease two sizes down to my waist. It took all of 10 minutes to try a few combinations of decreases.

New Waist Shaping

Granted, all this preparation has taken me a few days, but what is a few extra days when compared to years of sweater enjoyment?

To seam or not to seam… why not both?

Everyone has an opinion on seams versus circular knitting. Seams provide structure, while circular provides drape and, more importantly in many minds, no seaming.

I, too, love knitting my sweaters in the round, but when I do, I miss the structure and shaping the seams preserve. It’s the construction that prevents my long sweater from becoming knee-length, and my overlapping fronts from stretching too far.

Earlier this year, I ran across an article that turned my world on it’s head. Knit your sweater in the round, with an extra purl stitch where a seam would normally be, then mattress stitch each side of the purl stitch together. Less inside seam, more structure, best of both worlds!

basted_seam_how_to_continued

I’m currently knitting a sweater in the round and plan on testing out this technique. It’s simply genius, and I appreciate Karen Templer for sharing it.

Growth and Introductions

I’m in the process of updating both my website and my brand.

KnittingCodeMonkey has grown to become StrongishFiber.

I felt that it better suited my personal development from a junior programmer learning to knit to a full fledged software engineer with deep experience in knitting, spinning, fiber and yarn dyeing, sewing, and other mixed media arts. I am no longer a young grasshopper, and am ready to enter the world as a resource and an educator.

I look forward to sharing some of my favorite tips, tricks, techniques, and the people who taught them to me. Follow me as I explore my art, and introduce you to ideas that improve yours.